Trajectory Predictions and Particle Systems
Player feedback is important for making games. If the player is not sure what consequence a certain action will have the game can feel unfair, and not fun. One instance of this is in a game where you throw some object through the air, maybe a golf game or something like Angry Birds. If the object of the game is to hit stuff, it will not be very fun if you do not know where you are actually aiming. A while back I needed to do this exact thing and I had a hard time drumming up high school physics or finding some resource online that gave me a quick, simple solution. So I wanted to write about how I achieved this.
In this blog post I will cover the math behind calculating a trajectory, how to implement that in code, how we can add decals to geomtrey where our projectile will collide with something, and how we can simulate physics in Unity to calculate complex trajectories.
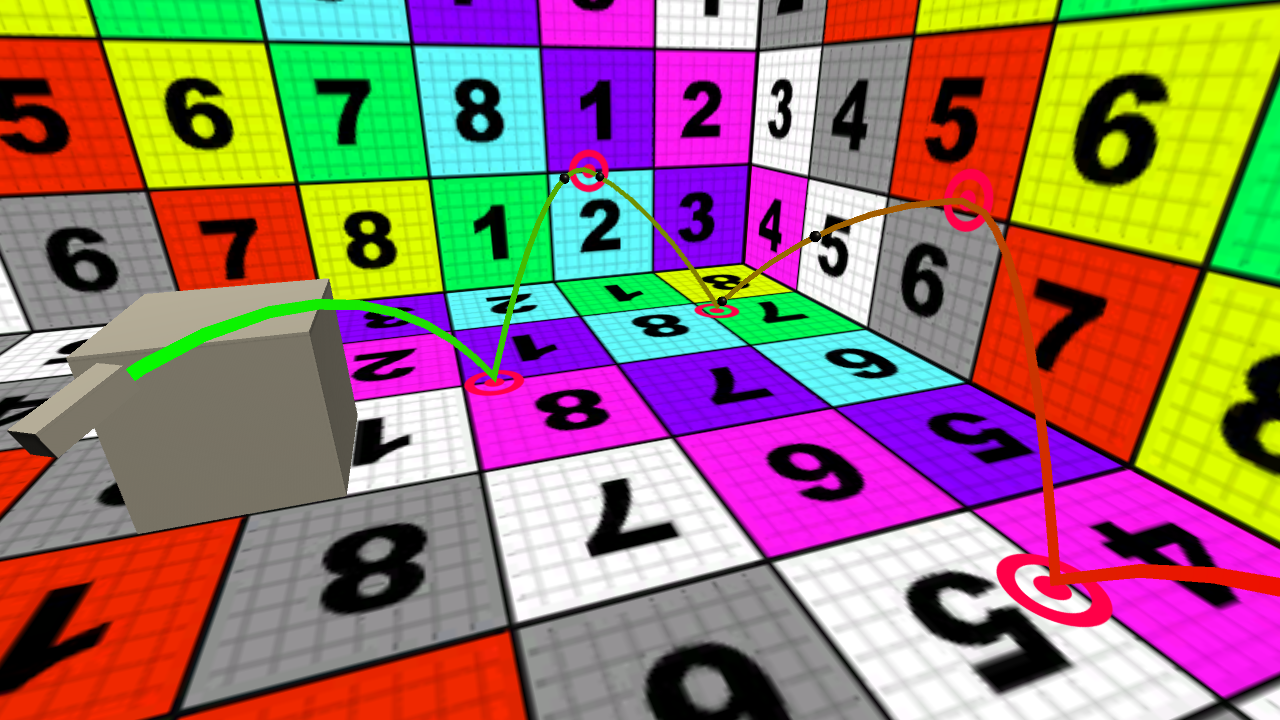
This is what our final product will look like. Notice the decals drawn where ever we have collisions
Part 1: Setting Up Our Projectile Scene
To start we are just going to get a basic scene set up with ground, a player launcher object, and a few scripts to allow control over the launcher and fire
projectiles. I am guessing almost everyone reading this can set this up but I am going to go through it so anyone can use this post. If you want, skip to the
end of this section there will be a link to where you can download everything you need to get going with the next section. Just be sure to add a Player
layer and a Projectile
layer, set the objects in the download to the appropriate layers and change the collision settings to stop these two layer
from interacting.
To get setup make a new scene in Unity, add a plane, reset it's transform and scale it up along all three axis. This will be our ground. Next create an empty
game object, name it something like Launcher or Player. Go up to layer and create a new layer, I called mine Player
and then add our empty launcher object
to that layer. We do this because later we won’t want our projectile colliding with our launcher as it exits the barrel. Then add a cube as a child to our
launcher object, scale it up a bit in the z-axis, I set it to 3
. And then move it along the z-axis a bit, I moved mine to z = 1
.
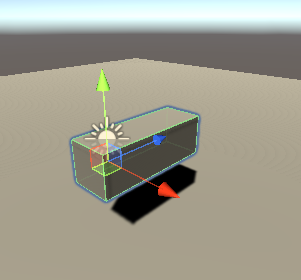
On the left we have our scene view of our launcher model, and on the right we have the transform of the child cube we added.
First we will create some simple controls for our launcher. We will limit these to rotation and firing our projectile. Make a script called AimController
.
Add a public Vector2 to control the rotation speed of our launcher. Then create a private Rotate function. Inside the function we will
grab the eulerAngles representation of our object’s rotation. Then grab the horizontal and vertical input axis multiplied by the respective rotation speed and
deltaTime. Add the input amount to the eulerAngles we grabbed before and apply it back to our transform with Quaternion.Euler(). Then call the
function in update. Add the script to the root of the launcher object and set the rotation speed to what ever you like. I went with 45 for both x and y. This will
give us all the movement control we need. Your script should look like snippet below.
public class AimController : MonoBehaviour
{
    public Vector2 rotSpeed;

    // Update is called once per frame
    void Update()
    {
        Rotate();
    }

    void Rotate()
    {
        Vector3 currentRotation = transform.rotation.eulerAngles;

        Vector3 desRot = new Vector3();
        desRot.x = Input.GetAxis("Vertical") * rotSpeed.x;
        desRot.y = Input.GetAxis("Horizontal") * rotSpeed.y;

        desRot *= Time.deltaTime;

        currentRotation += desRot;

        transform.rotation = Quaternion.Euler(currentRotation);
    }
}
Simple code to get rotation control for our launcher.
Now to get get firing control for our launcher. First, add a sphere to our scene and give it a RigidBody component.
Create a new Projectile layer and add it to that new layer. I also added a black, metallic material to it to set it apart.
Then make a prefab out of that sphere
so that we have a projectile that our launcher can instantiate into the scene when we want to fire a new projectile. Then go Edit >
ProjectSettings > Physics and uncheck the box for the Player layer and the Projectile layer in the Layer Collision Matrix section. This will stop our projectile
from colliding with our launcher when it is first fired.
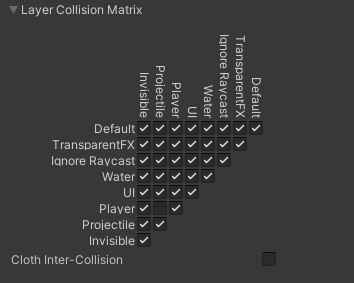
Uncheck that box for the Player and Projectile layer. Ignore that Invisible layer, we will get to that later.
Now create two more scripts, one called LaunchController and the other called ProjectileController. The LaunchController will be
responsible for instantiating our projectile and the ProjectileController will provide us access to the RigidBody of the projectile
so that we can easily set it’s velocity.
The ProjectileController will just have a public RigidBody field that we will assign in the inspector so that we will have easy access to it
from the LaunchController. The LaunchController is pretty simple.
It will have two public fields, one for the initial speed of our projectile and one for the projectile prefab.
Then in update we check for a button press and if so we call a function that will instantiate an instance of our projectile prefab and set the velocity of
it’s rigid body to be equal to the launchers forward vector times the initial speed. Add the LaunchController to the root of the launcher
object and add the ProjectileController to the projectile prefab.
public class ProjectileController : MonoBehaviour
{
    public Rigidbody Rigidbody;
}
Our ProjectileController
public class LaunchController : MonoBehaviour
{
    public float launchVelocity = 15f;
    public ProjectileController projectilePrefab;

    private void Update()
    {
        if (Input.GetKeyDown(KeyCode.Space))
        {
            LaunchProjectile();
        }
    }

    void LaunchProjectile()
    {
        ProjectileController projectile = Instantiate(projectilePrefab, transform.position, Quaternion.identity);

        projectile.Rigidbody.velocity = transform.forward * launchVelocity;
    }
}
And our LaunchController
Add the LaunchController to the root of the launcher object and add the ProjectileController to the projectile prefab. Then assign
the RigidBody of the projectile to the public field of the ProjectileController. Then add the projectile prefab to the public field
of the LaunchController and you should be all set to launch spheres to your heart’s content.

OK we can launch stuff, now lets get to the math!
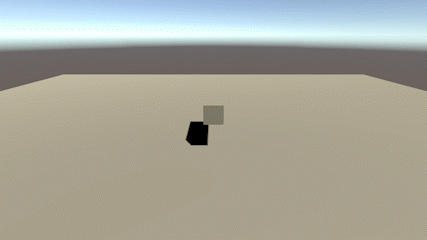
If everything went right for you, you should have something similar to the above gif. If you skipped ahead, or something is not working, you can grab the package for this scene and all of the code here. Just make sure you set the layers and physics settings accordingly.
Part 2: Trajectory Math
Ok, so now that we have a way to launch objects lets start talking about how we can calculate the trajectory of our projectile. To do this we need two equations. We need one to determine the horizontal position of the projectile as a function of time, and we need another one for the vertical position. Then we can add these two positions together and get our position at any time. For now we will assume only gravity acts on our projectile.

The two equations we need to calculate the posision of our projectile. On top we have our horizontal position and on bottom we have our vertical position. Pos is the final position, Pos0 is the starting position, V0 is the starting velocity, t is time, and g is gravity.
These equations make sense to us. We start at some position, we move by some velocity every unit of time, and if we have acceleration our velocity is changed by some amount every unit of time. The gravity term looks a little funny but if you have ever taken calculus, it is just the power rule going on. And if you have not taken calculus, don’t worry, we do not need to have a complete understanding of these equations. To use these equations we are missing something though, we need the velocity broken down into vertical and horizontal components.
Because Unity can provides us with a normalized Vector3 for our launch direction, we could cheat to get these two velocities. Actually we have three, X, Y, and Z. The X, Y, and Z components of this Vector3 are the X, Y, and Z components of any point on the unit circle, or sphere. We could just multiply them by the total initial velocity and that would give us the horizontal and vertical components in all three directions. However, I think it is worth while to understand the triganometry of actauly calculating these vectors on their own, as understanding these is useful in a lot of different game developement programming.
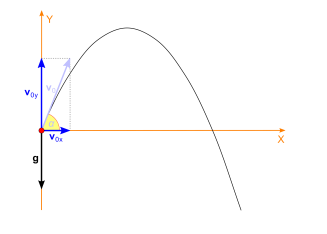
This is the real problem we are solving. We need to figure out that launch angle and then we can use math to get the horizontal and vertical components. Photo credit toppr.com.
If we can remember our triganometry from high school, we remember that the sin of the angle equals the length of the opposite side of the triangle
divided by the hypotenuse of the triangle. So the sin of the angle multiplied by the length of the hypotenuse, or our launch speed, is our vertical initial
velocity. For our horizontal velocity we do the same but with the cos because the cos of the angle equals the adjacent side of the triangle
divided by the hypotenuse of the triangle. The cos of the angle multiplied by our launch speed is our initial horizontal velocity. We then would just need to
break that down into the X and Z components. Easy! To get the angle we just work backwards. We know the Y component of our launch direction. The arcsin
of this gives of the angle off of the horizon. Also easy!
In code all we have to do is calculate these velocities following the above logic and then use the two formulas from above to get the virtical and horizonal parts of our position and add them together. There is just one small problem, time. How long do we do this for. It would be helpful if we could know how long until we were going to hit the ground. Well, when our Y position = 0 we know we are hitting the ground. If we set that second forumla equal to 0 it looks a lot like the condition for using the quadratic formula to solve for t. And it is! We can use the quadratic formula to solve for t!
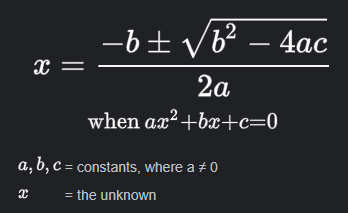
Substitue t for x and this is exactly the problem we have to solve.
And with that we have all the logic we need to calulate our trajectory. We figure out our initial velocities, solve for how long our projectile will be in the air, and then step through the position formulas at what ever pace we want to get the positions along our trajectory. All we have to do is write this in code.
Part 3: Writing the Code
So the things we need are our launch direction, our launch angle, our initial velocity, and the variables for the quadratic formula: a, b, and c. To do this,
create a TrajectoryCalculator script. Remove the inheritance from Monobehavior, delete the Start and Update methods and
make the TrajectoryCalculator at static class. We will put all of the methods for getting the information about our trajectory in this
class and because it is static any object can easily get access to these methods. Lets first get the launch direction, and the launch angle. Add a method for
getting the launch direction and a method for calculating the launch angle from that direction. Lets keep all of this private because we will provide a single
public method that other objects can use to interface with our calculator.
using UnityEngine;

public static class TrajectoryCalculator
{
    static Vector3 GetLaunchDirection(Transform launchTransform)
    {
        return launchTransform.forward;
    }

    static float GetLaunchAngle(Vector3 launchDirection)
    {
        return Mathf.Asin(launchDirection.y);
    }
}
The simple start of our calculator. We could get away with not having methods for these calculations but it makes it easy to change later how these parts of the process work. For example if we wanted to change how we calculate the launch direction we would just need to change this method and not any code that uses it.
Now what we will do is declare a public static method that will take a some parameters that our LaunchController has and processes them to give us
the needed information about out trajectory. We will have it return a TrajectoryInfo struct that will contain all of this information. Lets declare
that in its own file because it will be used by our LaunchController as well. So create this script in Unity. This struct will contain the launch
direction, the launch position, the initial speed, the launch angle, and the time to floor or ground.
using UnityEngine;

public struct TrajectoryInfo
{
    public Vector3 LaunchDirection { get; private set; }
    public Vector3 StartingPosition { get; private set; }
    public float InitialHorizontalSpeed { get; private set; }
    public float InitialVerticalSpeed { get; private set; }
    public float TimeToFloor { get; private set; }

    public TrajectoryInfo(Vector3 launchDirection, Vector3 startingPos, float initialSpeed, float launchAngle, float timeToFloor)
    {
        LaunchDirection = launchDirection;
        StartingPosition = startingPos;
        InitialHorizontalSpeed = Mathf.Cos(launchAngle) * initialSpeed;
        InitialVerticalSpeed = Mathf.Sin(launchAngle) * initialSpeed;
        TimeToFloor = timeToFloor;
    }
}
Now before we write our GetTrajectoryInfo method in our calculator we need to write the code to get what I am calling TimeToFloor.
To do this we will add a private struct to our calculator class that will hold the variables of the quadratic formula. Then we will pass an instance of this
struct into a method that will use the quadratic formula to calculate the time to floor. The code for the method that calculates the quadratic formula is pretty
straight forward but I will point out a few things.
First lets say we want to solve for a time besides when y = 0. This y = 0 constraint is kind of limiting. If our ground is at a height of -5 for example and not 0 this doesn’t really help. But we can fix this by setting y to what ever height we want in our quadradic formula and then subtracting that height from both sides of the equation. So instead of C in our equation equaling the starting height of our projectile, C will equal the starting height minus the floor, what ever that may be. This allows us a bit more freedom in using this calculation.
The second thing to be aware of is that square root. We do not want to try and take the square root of a negative number as it will return NAN.
This would only happen if we either turned off gravity or if we set the floor to a height higher than our projectile will go. Both of these are very edge cases
that we can mostly ignore. But we should check to see if we are going to take the square root of a negative number before we do it, and return -1 if we are so that
what ever is calling the method can be aware that we are not providing valid trajectory info.
With that being said add the following to our TrajectoryCalculator class.
  static QuadParams GetQuadParams(float initialVelocity, float projectileAngle, float startingHeight, float floor)
    {
        float a = .5f * Physics.gravity.y;
        float b = initialVelocity * Mathf.Sin(projectileAngle);
        float c = startingHeight - floor;

        return new QuadParams(a, b, c);
    }

    static float GetTimeToFloor(QuadParams quadParams)
    {
        float determinant = (quadParams.B * quadParams.B) - (4 * quadParams.A * quadParams.C);

        if (determinant < 0)
        {
            Debug.LogWarning("Trying to take square root of negative number, check gravity in physics settings!!!");
            return -1;
        }
        else
        {
            determinant = Mathf.Sqrt(determinant);
        }

        return (-quadParams.B - determinant) / (2 * quadParams.A);
    }

    struct QuadParams
    {
        public float A { get; private set; }
        public float B { get; private set; }
        public float C { get; private set; }

        public QuadParams(float a, float b, float c)
        {
            A = a;
            B = b;
            C = c;
        }
    }
Now all we have to do is add the GetTrajectoryInfo method to our calculator class and our launcher can get the information it needs to describe
the trajectory of the projectile. Add the following to our TrajectoryCalculator class.
  public static TrajectoryInfo GetTragectoryInfo(Transform fireTransform, float initialSpeed, float startingHeight, float floor)
    {
        //we get the fireDirection from the forward of the fireTransform
        Vector3 fireDirection = GetLaunchDirection(fireTransform);

        //then we use that to get the fire angle off the horizon
        float fireAngle = GetLaunchAngle(fireDirection);

        //then with that info and some of the original parameters we can calculate a, b, and c of the quadratic formula
        //the QuadParams struct just wraps those up together for us
        QuadParams quadParams = GetQuadParams(initialSpeed, fireAngle, startingHeight, floor);

        //then we can use that to get the timeToFloor
        float timeToFloor = GetTimeToFloor(quadParams);

        //and then we have all the info to describe the trajectory of our projectile
        return new TrajectoryInfo(fireDirection, fireTransform.position, initialSpeed, fireAngle, timeToFloor);
    }
Before we return to our LaunchController we still have one more thing to do. We need to use this trajectory info to calculate the points along
the trajectory. Now our launcher could do this but I like having the calculator do this for us. Our LaunchController could start to get complicated
as our game gets more complicated. Also other objects might want to be able to do this and that would mean we have to re-write this code in every class that
wants to do trajectory calculations.
So with that being said lets add a function that will step through our trajectory storing the positions in a Vector3 array. We pass in the trajectory info,
the number of points we want to record, and array that can store the points. The array is an out type because later we will want to return
different data from this function. It is not completely necessary as an array is a reference type but I like to this it helps communicate how this function
works a little better. Then we calculate the time step for our trajectory, size the array, and calculate the positions using our two original formulas
that we talked about earlier in a for loop.
The only thing to note is
that we have to adjust our horizontal velocity. This is because we split our total velocity into vertical and horizontal, not X, Y, and Z components. We could
easily change the other parts of our code, and probably should, but I wanted to highlight the triganometry, and the extra cpu cycles for this is pretty small.
Add the following code to our TrajectoryCalculator class.
  //this formula takes in out trajectory info and some info and calculates the positions along the trajectory
    public static void GetTrajectoryPoints(TrajectoryInfo trajectoryInfo, int resolution, out Vector3[] points)
    {
        //calculate the time between points on our trajectory
        float timeStep = trajectoryInfo.TimeToFloor / resolution;

        //and assign the points array to have the correct size, we use + 1 because we want to go all the way to the floor
        points = new Vector3[resolution + 1];

        //we have to use the normalized vector of the horizontal components of our fireDirection, because they need to have a magnitude of 1
        //unless there is no horizontal comonent
        Vector2 horizontal = new Vector2(trajectoryInfo.LaunchDirection.x, trajectoryInfo.LaunchDirection.z);
        if (horizontal.sqrMagnitude != 0f)
        {
            horizontal = horizontal.normalized;
        }

        //then we just step through assigning all of the points
        for (int i = 0; i < points.Length; i++)
        {
            //current time of along trajectory
            float currentTime = timeStep * i;

            //then we just need to brake it down into x and z components by using the direction
            float xPart = horizontal.x * trajectoryInfo.InitialHorizontalSpeed;
            float zPart = horizontal.y * trajectoryInfo.InitialHorizontalSpeed;

            //and apply the time to get the x and y positions
            float xPos = xPart * currentTime + trajectoryInfo.StartingPosition.x;
            float zPos = zPart * currentTime + trajectoryInfo.StartingPosition.z;

            //then for the y position we just use the formula from above
            float yPos = trajectoryInfo.StartingPosition.y + trajectoryInfo.InitialVerticalSpeed * currentTime + (.5f * Physics.gravity.y) * (currentTime * currentTime);

            Vector3 point = new Vector3(xPos, yPos, zPos);
            points[i] = point;
        }
    }
Now lets go back to our launcher object. Add a LineRenderer component to the root object and set the setting as you like. We are going to create
a TrajectoryDrawer class that we will add to our launcher that will be responsible for getting the trajectory positions and assigning them to the
positions of the line renderer. To start we will create a struct in this class that will hold the drawing settings, for now the resolution of our trajectory and
the floor. Then we will also add private fields for the LaunchController and the LineRenderer along with a Vector3[]. We
will grab the needed references in Awake.
using UnityEngine;

[RequireComponent(typeof(LineRenderer), typeof(LaunchController))]
public class TrajectoryDrawer : MonoBehaviour
{
    public TrajectoryDrawingSettings drawSettings;

    [System.Serializable]
    public struct TrajectoryDrawingSettings
    {
        public int resolution;
        public float floor;
    }

    LineRenderer lineRenderer;
    LaunchController launchController;

    Vector3[] points;

    private void Awake()
    {
        lineRenderer = GetComponent<LineRenderer>();
        launchController = GetComponent<LaunchController>();
    }
}
OK, now in update we will call a method that will get the trajectory info, and if we get a valid trajectory back we will get the points along the trajectory
and then assign them to the line renderer. And if you haven’t already, add the TrajectoryDrawer component to our launcher object.
  private void Update()
    {
        CalculateTrajectoryPath();
    }

    void CalculateTrajectoryPath()
    {
        TrajectoryInfo trajectoryInfo = TrajectoryCalculator.GetTragectoryInfo(transform, launchController.launchVelocity, transform.position.y, drawSettings.floor);

        if (trajectoryInfo.TimeToFloor >= 0)
        {
            TrajectoryCalculator.GetTrajectoryPoints(trajectoryInfo, drawSettings.resolution, out points);
        }

        lineRenderer.positionCount = points.Length;
        lineRenderer.SetPositions(points);
    }
Now one little optimization we will make is to only calculate the trajectory if our launchers transform has changed. Otherwise we will just be calculating the
same data that we already have. In TrajectoryDrawer we will add a private bool that will keep track of if we need to recalculate the
trajectory. We will also add a public method to set this bool. Then in the AimController we will grab a reference to the TrajectoryDrawer
and if we have changed our rotation we will tell the TrajectoryDrawer that we need to recalculate the trajectory. Make the following changes.
public class TrajectoryDrawer : MonoBehaviour
{
    public TrajectoryDrawingSettings drawSettings;

    [System.Serializable]
    public struct TrajectoryDrawingSettings
    {
        public int resolution;
        public float floor;
    }

    LineRenderer lineRenderer;
    LaunchController launchController;

    Vector3[] points;

    bool isDirty;

    public void SetDirty()
    {
        isDirty = true;
    }

    private void Awake()
    {
        lineRenderer = GetComponent<LineRenderer>();
        launchController = GetComponent<LaunchController>();
    }

    private void Update()
    {
        if (isDirty)
        {
            CalculateTrajectoryPath();

            isDirty = false;
        }
    }

    void CalculateTrajectoryPath()
    {
        TrajectoryInfo trajectoryInfo = TrajectoryCalculator.GetTragectoryInfo(transform, launchController.launchVelocity, transform.position.y, drawSettings.floor);

        if (trajectoryInfo.TimeToFloor >= 0)
        {
            TrajectoryCalculator.GetTrajectoryPoints(trajectoryInfo, drawSettings.resolution, out points);
        }

        lineRenderer.positionCount = points.Length;
        lineRenderer.SetPositions(points);
    }
}
public class AimController : MonoBehaviour
{
    public Vector2 rotSpeed;

    TrajectoryDrawer trajectoryDrawer;

    private void Awake()
    {
        trajectoryDrawer = GetComponent<TrajectoryDrawer>();
    }

    // Update is called once per frame
    void Update()
    {
        Rotate();
    }

    void Rotate()
    {
        Vector3 currentRotation = transform.rotation.eulerAngles;

        Vector3 desRot = new Vector3();
        desRot.x = Input.GetAxis("Vertical") * rotSpeed.x;
        desRot.y = Input.GetAxis("Horizontal") * rotSpeed.y;

        if(desRot != Vector3.zero && trajectoryDrawer != null)
        {
            trajectoryDrawer.SetDirty();
        }

        desRot *= Time.deltaTime;

        currentRotation += desRot;

        transform.rotation = Quaternion.Euler(currentRotation);
    }
}
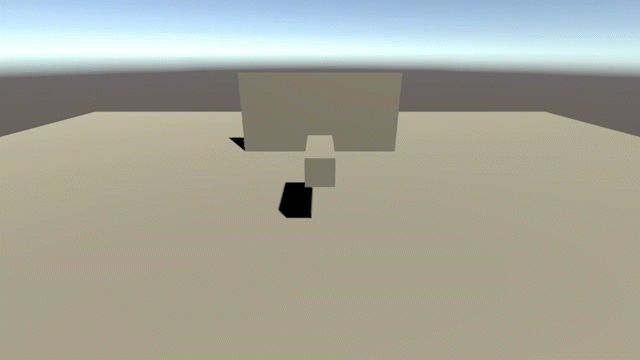
Nice, look at that trajectory
Cool, and with that we have our trajectory calculations taken care of. From here we could go a lot of different directions. We could add calculations to take into account other forces like drag or friction, we coud add bounce prediction. None of this would be that hard to add, we would just need to account for these extra variables in our equations.
The thing is though, we can really only do this if we handle all of the physics. We would have to write all the code for how collisions are handled. Not impossible, but not really the point of this blog post. The reason for this is that Unity’s physics code is complex, and even if we could accurately predict how it would react we might get rounding errors and such that still leave us with the wrong calculations.
I will leave writing your own collision handling as an exercise for the reader. If you want help, contact me and I might write a post about how we could do that. Instead I think it will be more fun to add some decals to where our projectile will collide and then wrap up this post by showing how we can simulate Unity’s physics engine to calculate more complex trajectories.
You can grab all of the code up to this point here.
Part 4: Decals And Particle Systems
To add decals to where our projectile collides with other objects we will use particle systems. If we add a particle system to our launcher object we can write a script that controls the particle system from code. All we have to do is figure out where to put the particles and how to orientate them. Before we set up our particle system lets handle that first problem, where to put the particles.
Currently our trajectory calculation has no idea of when it is
going to hit something, except for the floor value we define. But if there is an obstacle in the way we should account for that. To do this handle this, when
we loop through our position equations to get the points of our trajectory, we can just RayCast from one point to the next, stopping and storing
the position of where ever we hit something.
To do this we will add a method to our TrajectoryCalculator class that will take in three parameters: the point we are rayCasting from, the point
we are rayCasting to, and a layerMask that will mask out our launcher object, because otherwise it would think we are going to hit the launcher. This method is
pretty straight forward. We first get a vector going from out first point to our second point, calculate the distance, and then calculate the direction that this
new vector is pointing in. Then we do the rayCast and return the RayCastHit generated from the rayCast.
static RaycastHit FindCollisionPoint(Vector3 from, Vector3 to, LayerMask collisionMask)
{
    RaycastHit hit;
    Vector3 vector = to - from;
    float distance = vector.magnitude;
    Vector3 direction = vector / distance;

    Physics.Raycast(from, direction, out hit, distance, collisionMask);

    return hit;
}
Add this method to our TrajectoryCalculator class.
Then in our GetTrajectoryPoints method we just have to call this function when appropriate, and if we hit something use that hit point instead of
the point we calculated. We need to add a layerMask parameter to this function because we need it for our rayCast.
If we hit something we can return early because the rest of our trajectory doesn’t matter. We then also resize
the array of points because otherwise we will have a lot of Vector3.zero and our line will be all wrong. If we don’t hit something we just do
as normal.
Vector3 point = new Vector3(xPos, yPos, zPos);

if(i > 0)
{
    RaycastHit hit = FindCollisionPoint(points[i - 1], point, collisionMask);

    if (hit.collider)
    {
        points[i] = hit.point;
        System.Array.Resize(ref points, i + 1);
        return;
    }
    else
    {
        points[i] = point;
    }
}
else
{
    points[i] = point;
}
Add everything after the highlighted portion inside of thr for loop in our GetTrajectoryPoints method in our TrajectoryCalculator
class.
The last thing we need to change our TrajectoryDrawer class to have a layerMask field that we can set. I set mine to everything except the player
and the projectile layers, because those are the ones we are not concerned with. Then we just add that to the call to GetTrajectoryPoints and we
are all set to go.
public class TrajectoryDrawer : MonoBehaviour
{
    public TrajectoryDrawingSettings drawSettings;

    [System.Serializable]
    public struct TrajectoryDrawingSettings
    {
        public int resolution;
        public float floor;
        public LayerMask collisionMask;
    }

    ...

    void CalculateTrajectoryPath()
    {
        TrajectoryInfo trajectoryInfo = TrajectoryCalculator.GetTragectoryInfo(transform, launchController.launchVelocity, transform.position.y, drawSettings.floor);

        if (trajectoryInfo.TimeToFloor >= 0)
        {
            TrajectoryCalculator.GetTrajectoryPoints(trajectoryInfo, drawSettings.resolution, out points, drawSettings.collisionMask);
        }

        lineRenderer.positionCount = points.Length;
        lineRenderer.SetPositions(points);
    }
Add the highlighted changes to our TrajectoryDrawer class and make sure to set it correctly in the inspector.
Now we know where we are going to hit something
Now to set this up with decals we first will setup the particle system that we are going to use for drawing the decals. Lets first make the material that we will be using to draw our decals with. Create a new material and set the shader to Particle > StandardUnlit. Set the Rendering Mode to Fade and the Color Mode to multiply. Then import the below target texture, set the alpha is transparency check box in the import settings and assign this texture to be the Albedo texture of our material.

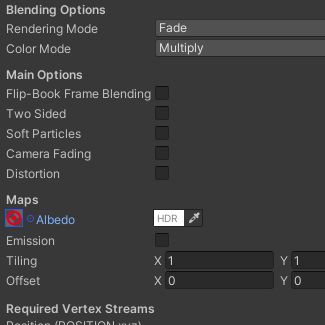
On the left the target texture to use on the material and the material settings on the right
Now add an empty gameObject to our launcher and name it something about particle systems.
Add a Particle System and turn off all of the modules except for the Renderer module at the bottom. In the Renderer
Module set the render Alignment to World and the material to be the material we just created. Also in the main Module set the PlayOnAway off.
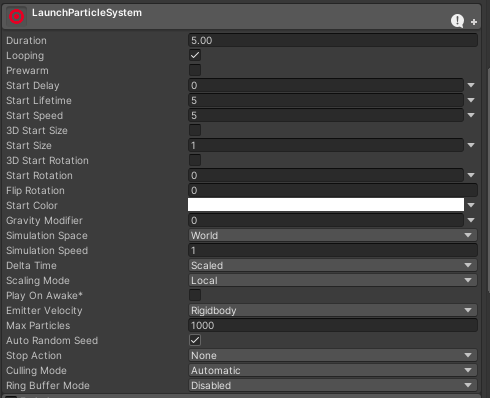
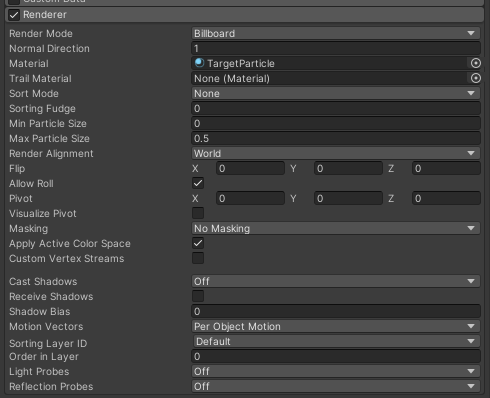
On the left is the Main Module settings and on the right is the Renderer Module Settings
Create a ParticleSystemController script and attach it to our new particle system object. To use the particle system to draw decals we will set the
properties of the particles in our system from code when ever we have a collision. To do this we will need to be able to set some values on each particle in the
system. This will require us to keep two arrays one for the particles in the system and one for the data that we want to set on each particle. We will define this
data in a new struct.
Create a new script and call it ParticleData and change it to a struct. This struct will keep track of 2 properties, the
position of the particle, and the rotation of the particle. Particles in Unity use Euler angles for their rotation so we will store the rotation as a Vector3
instead of a Quaternion.
public struct ParticleData
{
    public Vector3 position;
    public Vector3 rotation;
}
Our Particle Data struct.
Then in our ParticleSystemController script we will add fields for our Particle[], our ParticleData[], our
ParticleSystem, a settings Struct, and an int to keep track of which particle was last set. We will grab all the required references and setup
everything in the awake method.
[RequireComponent(typeof(ParticleSystem))]
public class ParticleSystemController : MonoBehaviour
{
    public ParticleSystemSettings systemSettings;

    [System.Serializable]
    public struct ParticleSystemSettings
    {
        public int maxParticles;
        public float particleSize;
    }

    ParticleSystem _particleSystem;

    ParticleSystem.Particle[] particles;
    ParticleData[] particleData;

    int lastSetParticleDataIndex = -1;

    private void Awake()
    {
        _particleSystem = GetComponent<ParticleSystem>();
        ResetParticleSystem();
    }

    void ResetParticleSystem()
    {
        particles = new ParticleSystem.Particle[systemSettings.maxParticles];
        particleData = new ParticleData[systemSettings.maxParticles];

        for (int i = 0; i < particleData.Length; i++)
        {
            particleData[i] = new ParticleData();
        }

        _particleSystem.Clear();
    }
}
The basic setup of our ParticleSystem controller
The rest of our ParticleSystemController will consist of three methods. We will have a SetParticle method, a ClearParticles
method, and a DisplayParticles method. Our TrajectoryDrawer will, if a collision is found, clear out the particle system, set the
desired particle, and then display the particles.
The ClearParticles method will just loop through the two arrays setting a few properties to effectivly turn of the particles. We only have to do
this up to the last set index because Particle is a struct that has default values of an invisible particle. So any particles we haven’t touched
will just be invisible. Then we set the lastSetIndex to be -1.
The SetParticle method will get the data from the RayCastHit and set the data accordingly on the next index to set. The only thing to note here is that
we have to flip the z of the collision normal or our particle will be backwards.
The DisplayParticles method will just loop up to the lastSetIndex and read the data out of the ParticleData[] and set it on the appropriate
particle. Add the following methods to our ParticleSystemController.
public void SetParticle(RaycastHit collisionData)
{
    int index = lastSetParticleDataIndex + 1;

    if(index < systemSettings.maxParticles)
    {
        ParticleData particle = new ParticleData();

        particle.position = collisionData.point + collisionData.normal * 0.01f;
        Vector3 normal = collisionData.normal;
        normal.z *= -1;
        particle.rotation = Quaternion.LookRotation(normal).eulerAngles;
        particleData[index] = particle;

        lastSetParticleDataIndex = index;
    }
}

public void ClearParticles()
{
    for (int i = 0; i <= lastSetParticleDataIndex; i++)
    {
        particles[i].startColor = Color.clear;
    }

    lastSetParticleDataIndex = -1;
}

public void DisplayParticles()
{
    for (int i = 0; i <= lastSetParticleDataIndex; i++)
    {
        particles[i].position = particleData[i].position;
        particles[i].rotation3D = particleData[i].rotation;
        particles[i].startSize = systemSettings.particleSize;
        particles[i].startColor = Color.white;
    }

    _particleSystem.SetParticles(particles, particles.Length);
}
But in order to do this our drawer needs to know about the collision that occured. We will have to change our
GetTrajectoryPoints method in our TrajectoryCalculator to give us the RaycastHit variable when it finds a collision. If it doesn’t
find a collision we will just manually set the position and orientation of the RayCastHit at the end of the method.
public static void GetTrajectoryPoints(TrajectoryInfo trajectoryInfo, int resolution,
    out Vector3[] points, out RaycastHit raycastHit, LayerMask collisionMask)
{
    raycastHit = new RaycastHit();

    //calculate the time between points on our trajectory
    float timeStep = trajectoryInfo.TimeToFloor / resolution;

...

            if(i > 0)
            {
                raycastHit = FindCollisionPoint(points[i - 1], point, collisionMask);

                if (raycastHit.collider)
                {
                    points[i] = raycastHit.point;
                    System.Array.Resize(ref points, i + 1);
                    return;
                }
                else
                {
                    points[i] = point;
                }
            }
            else
            {
                points[i] = point;
            }
        }

    raycastHit.point = points[points.Length - 1];
    raycastHit.normal = Vector3.up;
}
Make the highlighted changes
Now back in our drawer we just have to declare a public ParticleSystemController, assign it in the inspector, and then
tell the praticle system to draw at the new position. Dont forget to set a max particles number and size to our ParticleSystemController. I
am using 100 and 2.5 for the size.
public class TrajectoryDrawer : MonoBehaviour
{
    public ParticleSystemController particleSystemController;

    public TrajectoryDrawingSettings drawSettings;

    [System.Serializable]
    public struct TrajectoryDrawingSettings
    {
        public int resolution;
        public float floor;
        public LayerMask collisionMask;
    }

...

    void CalculateTrajectoryPath()
    {
        TrajectoryInfo trajectoryInfo = TrajectoryCalculator.GetTragectoryInfo(transform, launchController.launchVelocity, transform.position.y, drawSettings.floor);

        if (trajectoryInfo.TimeToFloor >= 0)
        {
            TrajectoryCalculator.GetTrajectoryPoints(trajectoryInfo, drawSettings.resolution, out points, out RaycastHit hit, drawSettings.collisionMask);

            particleSystemController.ClearParticles();
            particleSystemController.SetParticle(hit);
            particleSystemController.DisplayParticles();
        }

        lineRenderer.positionCount = points.Length;
        lineRenderer.SetPositions(points);
    }
Make the highlighted changes to our TrajectoryDrawer
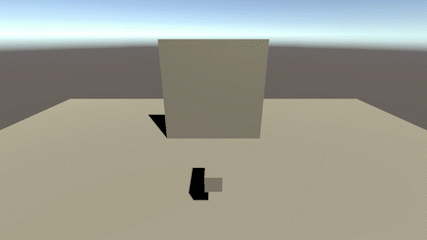
Target locked, Captain. Fire!!!
And with that we have our decals! In the next and final section we will use Unity’s Physics system to simulate the trajectory really quickly so that we can simply add complex trajectories to our trajectory prediction. Along with that we will setup the decals to be drawn at every collision point.
Ass always you can grab the the files up to this point here
Part 5: Physics Simulations
To handle complex trajectories we will use the physics engine in Unity to find the points along our trajectory. Unity allows us to create a copy of the physics scene used to simulate physics in a game. We can use this to get a copy of a physics scene that is a replica of our current scene. Then we can apply the force to our projectile and step through the physics in our replica scene, recording where our projectile goes along the way. The only caveat with this is that it isn’t cheap.
Physics in a game can be a very resource heavy process. And trying to simulate a whole bunch of it in a single frame is not going to help frame rate. It would be nice if we could multi-thread the simulation or at least move it off of the main thread but sadly we cannot, physics calls have to come from the main thread. If you want buttery smooth 60 fps and complex trajectory prediction, you really need a top tier machine, or start writing your own physics.
With that being said though, it is a cool feature Unity exposes to us and with some coroutines we can simulate the physics over time to keep our frame rate up. To start we will simply get the basic simulation running, then we will run it as a coroutine, yielding after some amount of time to let the main thread continue, and then we will combine it with our particle system and trajectory calculations.
We first will go into our TrajectoryDrawer and add a struct that will hold all of the data used for the simulation. Then in Awake
We are going to create a new scene passing in a CreateSceneParameter struct. This will prevent the new scene from auto updating the physics, which
is what allows us to control the physics of this new system. Then we grab all the physics objects in the main scene and duplicate them passing them over to the
new scene. We just have to make sure we make everything invisible so we are not seeing double. Make the highlighted changes.
using System.Collections;
using System.Collections.Generic;
using UnityEngine;
using UnityEngine.SceneManagement;

[RequireComponent(typeof(LineRenderer), typeof(LaunchController))]
public class TrajectoryDrawer : MonoBehaviour
{
    public ParticleSystemController particleSystemController;

    public TrajectoryDrawingSettings drawSettings;

    public SimulationSettings simulationSettings;

    [System.Serializable]
    public struct TrajectoryDrawingSettings
    {
        public int resolution;
        public float floor;
        public LayerMask collisionMask;
        public bool simulate;
    }

    [System.Serializable]
    public struct SimulationSettings
    {
        public float simulationTime;
    }

    struct SimulationData
    {
        public Scene simulatedScene;
        public PhysicsScene physicsScene;
        public ProjectileController simulatedProjectile;
        public GameObject[] colliders;
    }

    SimulationData simulationData;

...
Adding the structs that will control our simulation. Make sure to add the using directive at the top to allow us to use the SceneManagment API.
private void Awake()
{
    lineRenderer = GetComponent<LineRenderer>();
    launchController = GetComponent<LaunchController>();


    if (drawSettings.simulate)
    {
        SetupSimulationData();
    }
}

void SetupSimulationData()
{
    simulationData = new SimulationData();

    CreateSceneParameters createSceneParameters = new CreateSceneParameters(LocalPhysicsMode.Physics3D);
    simulationData.simulatedScene = SceneManager.CreateScene("Simulation Scene", createSceneParameters);
    simulationData.physicsScene = simulationData.simulatedScene.GetPhysicsScene();
    GetColliders();
    SetupSimulationScene();
}

void GetColliders()
{
    Collider[] colliders = FindObjectsOfType<Collider>();
    List<GameObject> colliderRoots = new List<GameObject>();

    for(int i = 0; i < colliders.Length; i++)
    {
        GameObject go = colliders[i].transform.root.gameObject;
        if (!colliderRoots.Contains(go) && go.layer != LayerMask.NameToLayer("Player"))
        {
            colliderRoots.Add(go);
        }
    }

    simulationData.colliders = new GameObject[colliderRoots.Count];

    for (int i = 0; i < simulationData.colliders.Length; i++)
    {
        simulationData.colliders[i] = Instantiate(colliderRoots[i]);
        simulationData.colliders[i].layer = LayerMask.NameToLayer("Invisible");
    }

    simulationData.simulatedProjectile = Instantiate(launchController.projectilePrefab);
    simulationData.simulatedProjectile.gameObject.layer = LayerMask.NameToLayer("Invisible");
}

void SetupSimulationScene()
{
    SceneManager.MoveGameObjectToScene(simulationData.simulatedProjectile.gameObject, simulationData.simulatedScene);

    foreach (GameObject go in simulationData.colliders)
    {
        SceneManager.MoveGameObjectToScene(go, simulationData.simulatedScene);
    }
}
Make the highlighted change to awake to only set up the simulation when needed and then add the other methods
You may have noticed that the way I make the objects invisible is by putting them in an Invisible layer. This means we have to add the Invisible
layer to our project, told you I would get back to that. Then change our camera to not see the Invisible layer by unchecking it in the CullingMask
property. Also, set the Invisible layer to only interact with its self in the physics settings. We do not want things running into invisible objects in
the main scene. I also do not add the player because it should not collide with our projectile anyway. Also, you could tag objects that you want in the simulation,
and grab objects with tags, but this is less work up front and it is happening in Awake anyway, so it will not hurt our performance when it matters.
Now to get this actually working. If we are using our simulation we will call a new SimulateTrajectory method instead of our
CalculateTrajectoryPath method. It will work by first reseting our projectile and our lineRenderer. We set the launch velocity on the projectile.
Then we calculate how much time needs to pass before we record a point. We enter into a loop that will terminate when we have completed our simulation.
The magic happens with the Simulate method. We pass in the amount of time to simulate and then the physics system updates that amount of time,
which will move our projectile. All we have to do is record its position when necessary. You may think we can increase the time step to increase the performance,
which is true up to a point. Too high of values will cause erratic behavior, so you can adjust it but be careful. The default is 0.02f BTW. I also add a check
just to make sure we don’t go outside of the bounds of our array.
private void Update()
{
    if (isDirty)
    {
        isDirty = false;

        if (drawSettings.simulate)
        {
            SimulateTrajectory();
        }
        else
        {
            CalculateTrajectoryPath();
        }
    }
}

...

void SimulateTrajectory()
{
    lineRenderer.positionCount = 0;

    //reset projectile and fire simulated projectile
    Rigidbody simBody = simulationData.simulatedProjectile.Rigidbody;
    simBody.position = launchController.transform.position;
    simBody.rotation = Quaternion.identity;
    simBody.angularVelocity = Vector3.zero;
    simBody.velocity = TrajectoryCalculator.GetLaunchDirection(launchController.transform) * launchController.launchVelocity;

    float timeStepToPoint = simulationSettings.simulationTime / drawSettings.resolution;
    points = new Vector3[drawSettings.resolution];
    int currentIndex = 0;

    for (float t = 0f; t < simulationSettings.simulationTime; t += Time.fixedDeltaTime)
    {
        if (currentIndex >= points.Length || isDirty)
        {
            break;
        }

        if (t >= timeStepToPoint * currentIndex)
        {
            lineRenderer.positionCount += 1;
            lineRenderer.SetPosition(currentIndex, simBody.position);

            points[currentIndex] = simBody.position;
            currentIndex++;
        }

        simulationData.physicsScene.Simulate(Time.fixedDeltaTime);
    }
}
Our simulation in action
Now to get this running as a coroutine we just need to set an amount of time that the simulation is allowed to run before taking a break. We call the method,
with the StartCoroutine method and make sure to stop any currently running coroutines before we start a new one. Make the following changes.
[System.Serializable]
public struct SimulationSettings
{
    public float simulationTime;
    [Range(0.0f, 0.1f)]
    public float simulationSpeed;
}

...

private void Update()
{
    if (isDirty)
    {
        isDirty = false;

        if (drawSettings.simulate)
        {
            StopAllCoroutines();
            StartCoroutine(SimulateTrajectory());
        }
        else
        {
            CalculateTrajectoryPath();
        }
    }
}

...

IEnumerator SimulateTrajectory()
{
    lineRenderer.positionCount = 0;

    //reset projectile and fire simulated projectile
    Rigidbody simBody = simulationData.simulatedProjectile.Rigidbody;
    simBody.position = launchController.transform.position;
    simBody.rotation = Quaternion.identity;
    simBody.angularVelocity = Vector3.zero;
    simBody.velocity = TrajectoryCalculator.GetLaunchDirection(launchController.transform) * launchController.launchVelocity;

    float timeStepToPoint = simulationSettings.simulationTime / drawSettings.resolution;
    points = new Vector3[drawSettings.resolution];
    int currentIndex = 0;

    float startTime = Time.realtimeSinceStartup;

    for (float t = 0f; t < simulationSettings.simulationTime; t += Time.fixedDeltaTime)
    {
        if (currentIndex >= points.Length || isDirty)
        {
            break;
        }

        if (t >= timeStepToPoint * currentIndex)
        {
            lineRenderer.positionCount += 1;
            lineRenderer.SetPosition(currentIndex, simBody.position);

            points[currentIndex] = simBody.position;
            currentIndex++;
        }

        simulationData.physicsScene.Simulate(Time.fixedDeltaTime);

        if (Time.realtimeSinceStartup - startTime >= simulationSettings.simulationSpeed)
        {
            yield return null;

            startTime = Time.realtimeSinceStartup;
        }
    }
}
Those changes should save your frame rate. I set my simulationSpeed to 0.005f
Now all that is left to do is to hook this up with our particle system and we are good to go. Because of how we set up the code for our particle system all
we have to do is reset the particle system and call SetParticle for every place we detect a collision and then
we call DisplayParticles to draw the particles to our scene. To find our particle’s position we will use a RayCast just like before,
except that we will always record the last position of the projectile as we go through our simulation, so that we can get a direction for our RayCast.
IEnumerator SimulateTrajectory()
{
    lineRenderer.positionCount = 0;
    particleSystemController.ClearParticles();
    particleSystemController.DisplayParticles();

    //reset projectile and fire simulated projectile
    Rigidbody simBody = simulationData.simulatedProjectile.Rigidbody;
    simBody.position = launchController.transform.position;
    simBody.rotation = Quaternion.identity;
    simBody.angularVelocity = Vector3.zero;
    simBody.velocity = TrajectoryCalculator.GetLaunchDirection(launchController.transform) * launchController.launchVelocity;

    float timeStepToPoint = simulationSettings.simulationTime / drawSettings.resolution;
    points = new Vector3[drawSettings.resolution];
    int currentIndex = 0;

    float startTime = Time.realtimeSinceStartup;

    Vector3 lastPos = simBody.position;

    for (float t = 0f; t < simulationSettings.simulationTime; t += Time.fixedDeltaTime)
    {
        if (currentIndex >= points.Length || isDirty)
        {
            break;
        }

        if (t >= timeStepToPoint * currentIndex)
        {
            lineRenderer.positionCount += 1;
            lineRenderer.SetPosition(currentIndex, simBody.position);

            points[currentIndex] = simBody.position;
            currentIndex++;
        }

        simulationData.physicsScene.Simulate(Time.fixedDeltaTime);

        Vector3 dir = (simBody.position - lastPos).normalized;
        if(Physics.Raycast(simBody.position, dir, out RaycastHit hit, 1f, drawSettings.collisionMask))
        {
            particleSystemController.SetParticle(hit);
            particleSystemController.DisplayParticles();
        }

        lastPos = simBody.position;

        if (Time.realtimeSinceStartup - startTime >= simulationSettings.simulationSpeed)
        {
            yield return null;

            startTime = Time.realtimeSinceStartup;
        }
    }
}
Make the above highlighted changes to our SimulateTrajectory method
And with that we can show multiple decals for our trajectory. I added a bouncy physics material to our projectile
You can grab the final code here.
Part 6: Wrap up
Now I probably wouldn’t use this simulation in a real game given the performance constraints on it. You would be better of handling collision yourself and
calculating trajectorys as we did in the first part. But if you were to use the simulation approach you could increase the accuracy of the target placement by
using SphereCasts instead of Raycasts. In any case it is fun to get the correct trajectories this way, and the ideas used for the particle system
could be used for all sorts of effects.
If you have any comments or something did not work for you, contact me via my support page or DM me on twitter @Feral_Pug and I should respond to you soon. If you want to support me you can donate at ko-fi.com/feral_pug.